Your walls can change the look and feel of a room without requiring a major renovation. With a few basic supplies and some creativity, you can make wall decor that reflects your style, fills empty spaces, and adds warmth to your home.
The best DIY projects are often simple, affordable, and easy to customize. Whether you prefer modern shapes, natural textures, family photos, or colorful artwork, there is a wall decor idea for every skill level.
1. Create a Gallery Wall
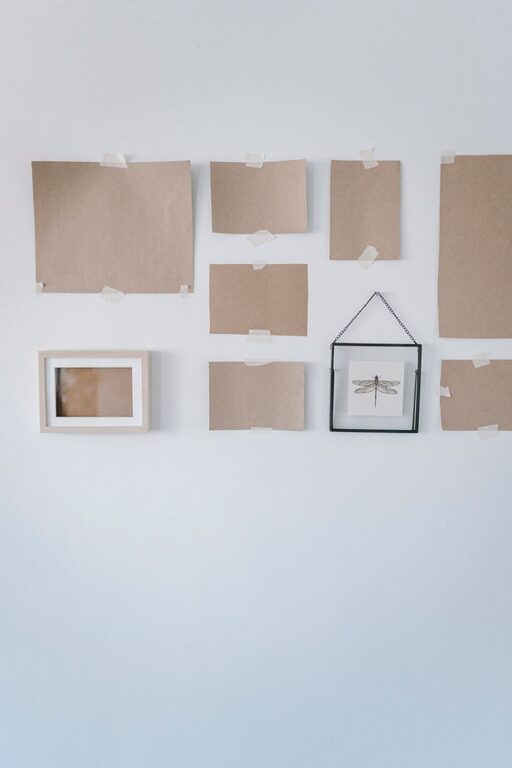
A gallery wall is a flexible way to display art, photographs, postcards, and meaningful objects in one organized arrangement. It can be symmetrical and polished or relaxed and eclectic.
What you need
– Picture frames in different sizes
– Artwork, prints, or personal photos
– Paper for making templates
– Painter’s tape
– A pencil and measuring tape
– Picture hooks or removable hanging strips
Start by arranging your frames on the floor. Try several layouts before choosing one. A balanced arrangement does not have to use matching frames, but repeating one element, such as a color or finish, can help the display look connected.
Trace each frame onto paper and cut out the shapes. Use painter’s tape to attach the paper templates to the wall. This lets you test the arrangement and mark hanging points without making unnecessary holes.
For a more personal display, mix family photos with simple artwork, travel memories, pressed leaves, or small mirrors. Leave a similar amount of space between the pieces to create a tidy appearance.
2. Make a Fabric Wall Hanging
Fabric wall hangings add softness and texture to a room. They are especially useful in bedrooms, reading corners, and comfortable living spaces.
Choose a fabric that matches your room’s colors. You can use a patterned textile, an old scarf, a piece of woven fabric, or a plain cloth decorated with fabric paint.
Simple method
- Cut the fabric to your preferred size.
- Fold the top edge over a wooden dowel.
- Secure the fold with fabric glue or careful stitching.
- Tie a length of cord or ribbon to both ends of the dowel.
- Hang the piece from a wall hook.
For extra detail, add yarn, ribbon, tassels, or wooden beads along the bottom edge. You can also create several small fabric panels and hang them together as a set.
3. Design a Painted Geometric Accent
You do not need advanced artistic skills to create bold wall art. Simple geometric shapes can make a strong visual statement while remaining easy to paint.
Choose two or three colors that work with your existing furniture. Neutral shades create a calm look, while brighter colors can bring energy to a plain wall.
Use painter’s tape to outline triangles, arches, blocks, or overlapping rectangles. Press the edges of the tape firmly against the wall to reduce paint seepage. Apply thin coats and allow each section to dry before removing the tape.
For a softer design, paint a large arch behind a shelf, desk, or bed. This creates the appearance of a built-in focal point without covering the entire wall.
4. Turn Baskets Into Wall Decor
Decorative baskets can add pattern, texture, and storage to a blank wall. A collection of baskets works well in entryways, dining areas, and living rooms.
Look for baskets in different sizes, but choose styles that share a common color or material. Arrange the largest baskets first, then fill gaps with smaller pieces.
Before hanging them, place the baskets on the floor and take a photo of the arrangement. This makes it easier to recreate the design on the wall. Use sturdy hooks suitable for the weight of each basket.
Baskets can remain empty, or you can add dried flowers, lightweight textiles, or seasonal decorations. If you need extra storage, use deeper baskets to hold small items while keeping them within reach.
5. Create a Floating Photo Display
A simple photo display can add personality without looking too formal. Instead of placing photos in individual frames, hang them from clips along a cord or narrow wooden rail.
Attach two wall hooks and stretch a piece of twine, wire, or ribbon between them. Use small clips to hold your photos in place. You can change the pictures whenever you like, making this a useful option for family photos, children’s artwork, or seasonal images.
For a more finished look, mount the cord inside a wooden frame. Paint the frame to match your furniture, or leave it natural for a casual appearance.
6. Make a Mirror Arrangement
Mirrors reflect light and can make a room feel more open. A group of small mirrors is often more interesting than one large mirror, especially on a narrow wall.
Collect mirrors with different shapes, such as round, oval, square, or arched designs. To keep the display from feeling cluttered, choose mirrors with similar frames or use one consistent color.
Arrange them on the floor first. Leave enough space between each mirror so the individual shapes remain clear. Hang the largest mirror slightly off center, then place smaller mirrors around it to create a balanced composition.
This idea works well in hallways, above a console table, or on a wall opposite a window.
7. Display Pressed Plants
Pressed leaves and flowers bring a natural touch indoors. They are simple to display and can suit many decorating styles.
Place leaves or flowers between sheets of paper and press them inside a heavy book for several days. Once completely dry, arrange them on thick paper or cardstock and secure them with small pieces of clear tape or glue.
Frame each piece separately, or place several specimens in one large frame. Use a neutral background to keep the focus on the plants. Ferns, small flowers, grasses, and colorful leaves can all create attractive patterns.
If you want a lower-maintenance option, use artificial leaves or botanical illustrations instead.
8. Build a Simple Wooden Sign
A wooden sign can add a welcoming message, a favorite word, or a simple decorative pattern. Use a small unfinished wood board from a craft store or repurpose a clean piece of scrap wood.
Sand the surface, then apply paint or wood stain. Once it dries, add lettering with a stencil, paint pen, or adhesive letters. You can also decorate the board with a border, small shapes, or a painted botanical design.
Choose a short message so the sign remains easy to read. Words such as “Welcome,” “Gather,” or “Relax” work well in common living spaces.
Tips for Better DIY Wall Decor
Keep these ideas in mind as you plan your project:
– Measure the wall before buying supplies.
– Use removable hanging strips when appropriate for lightweight pieces.
– Test paint colors on a small area before covering a larger section.
– Keep heavy objects on strong, suitable hardware.
– Repeat colors, shapes, or materials to create a connected look.
– Leave some empty wall space so the display does not feel crowded.
– Arrange pieces at a comfortable viewing height.
– Save templates, paint colors, and measurements for future changes.
Make Your Walls Your Own
DIY wall decor does not need to be expensive or complicated. A gallery wall, fabric hanging, painted shape, basket arrangement, or simple photo display can make a room feel more complete with only a few supplies.
Start with one small area and choose a project that fits your available time and skill level. As you experiment with colors, textures, and layouts, you can create wall decor that feels personal, practical, and uniquely suited to your home.
About the Author